Reading time: 9 minutes.
The realm of web development has continually expanded, and with it, the capabilities of CSS and HTML in game development have evolved significantly. While traditionally these technologies were not associated with game development, the advancements in web standards and browser capabilities have opened up new possibilities.

I’ll deep-dive into the basics, how it’s done and also provide two examples – a ‘brick-breaker’ style game and a ‘snake’ clone!
Understanding the Basics
HTML (HyperText Markup Language) is the standard markup language used to create web pages. It provides the structure of the page. When it comes to game development, HTML is used to lay out the basic structure of the game – like the game canvas, scoreboards, and control buttons.
CSS (Cascading Style Sheets) is used for describing the presentation of a document written in HTML. In game development, CSS is crucial for styling the game’s appearance, including layouts, colors, and animations.
The Role of HTML5 in Game Development
HTML5 introduced the <canvas> element, a game-changer in web-based game development. The <canvas> element is used to draw graphics on a web page. This is crucial for rendering game graphics, animations, and even handling user interactions. Here’s a basic example:
<!DOCTYPE html>
<html>
<body>

<canvas id="gameCanvas" width="480" height="320"></canvas>

<script>
var canvas = document.getElementById("gameCanvas");
var ctx = canvas.getContext("2d");
ctx.fillStyle = "#FF0000";
ctx.fillRect(0, 0, 150, 75);
</script>

</body>
</html>
This simple HTML5 code creates a canvas on which a red rectangle is drawn. This serves as a basic example of how game graphics can be rendered.
Utilizing CSS for Game Aesthetics
CSS is used to add style to your game. This includes setting backgrounds, defining animations, and responsive design for different screen sizes. Here’s an example of using CSS animations in a game:
@keyframes move {
  from {left: 0px;}
  to {left: 300px;}
}

#gameCharacter {
  width: 50px;
  height: 50px;
  position: relative;
  background-color: blue;
  animation-name: move;
  animation-duration: 2s;
}
This CSS code creates a simple animation where a game character (a blue square in this case) moves across the screen.
Interactivity with JavaScript
While CSS and HTML lay the foundation and style of the game, JavaScript is used to add interactivity. JavaScript allows for game logic implementation, event handling, and dynamic content manipulation. For instance, detecting user inputs (like keyboard or mouse events) and updating the game state accordingly.
Limitations and Considerations
While developing games with HTML and CSS is entirely possible, it’s essential to understand its limitations. These technologies are best suited for simpler, 2D games. Complex 3D graphics and high-performance requirements might be better served by other technologies like WebGL or game engines like Unity or Unreal Engine.
Browser Compatibility
One of the significant considerations when developing games with HTML and CSS is browser compatibility. Different browsers may render CSS and HTML differently. Hence, it’s crucial to test your game across multiple browsers to ensure consistent gameplay.
Accessibility and Responsiveness
When developing games with HTML and CSS, it’s vital to keep accessibility in mind. This includes designing games that are playable by people with disabilities. Responsiveness is another crucial factor, ensuring that the game is playable on various devices and screen sizes.
Example 1: Brick-Breaker Game
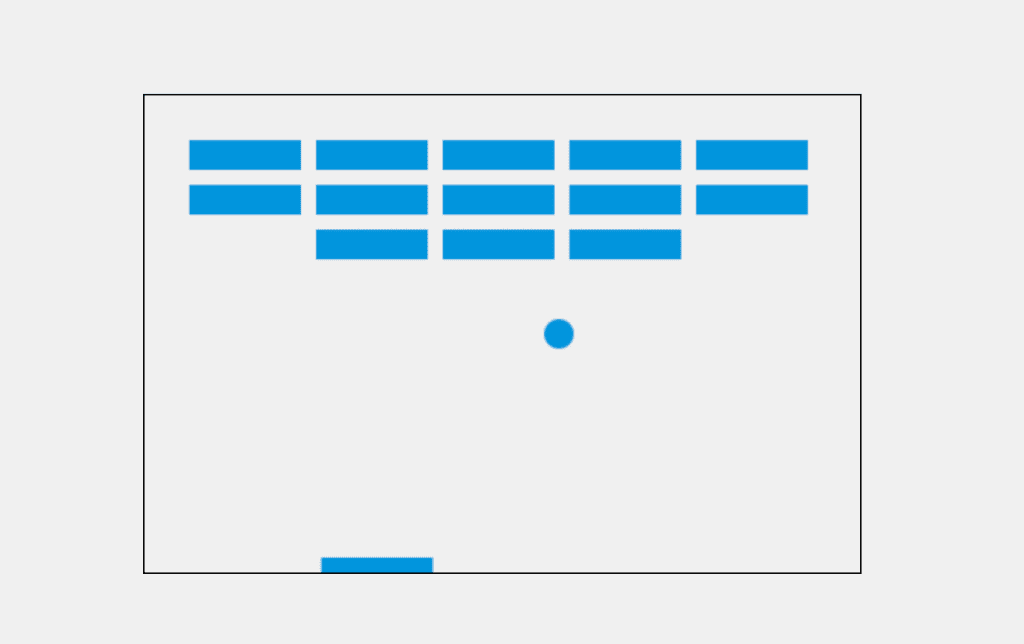
Creating a simple brick-breaker game using HTML, CSS, and JavaScript is a great way to understand the basics of game development in web technologies. Below, I’ll provide a basic example of how you can set up such a game. The game will consist of a paddle, a bouncing ball, and a set of bricks that the player needs to break by hitting them with the ball.
HTML (index.html)
This part sets up the canvas where the game will be rendered.
<!DOCTYPE html>
<html>
<head>
    <title>Brick Breaker Game</title>
    <link rel="stylesheet" type="text/css" href="style.css">
</head>
<body>
    <canvas id="gameCanvas" width="480" height="320"></canvas>
    <script src="game.js"></script>
</body>
</html>
CSS (style.css)
This CSS file will add basic styling to the canvas.
body {
    display: flex;
    justify-content: center;
    align-items: center;
    height: 100vh;
    margin: 0;
    background-color: #f0f0f0;
}

canvas {
    border: 1px solid #000;
}
JavaScript (game.js)
This JavaScript file contains the logic for the brick-breaker game.
var canvas = document.getElementById("gameCanvas");
var ctx = canvas.getContext("2d");

var ballRadius = 10;
var x = canvas.width / 2;
var y = canvas.height - 30;
var dx = 2;
var dy = -2;
var paddleHeight = 10;
var paddleWidth = 75;
var paddleX = (canvas.width - paddleWidth) / 2;
var rightPressed = false;
var leftPressed = false;
var brickRowCount = 3;
var brickColumnCount = 5;
var brickWidth = 75;
var brickHeight = 20;
var brickPadding = 10;
var brickOffsetTop = 30;
var brickOffsetLeft = 30;
var bricks = [];
for (var c = 0; c < brickColumnCount; c++) {
    bricks[c] = [];
    for (var r = 0; r < brickRowCount; r++) {
        bricks[c][r] = { x: 0, y: 0, status: 1 };
    }
}

document.addEventListener("keydown", keyDownHandler, false);
document.addEventListener("keyup", keyUpHandler, false);

function keyDownHandler(e) {
    if (e.key == "Right" || e.key == "ArrowRight") {
        rightPressed = true;
    }
    else if (e.key == "Left" || e.key == "ArrowLeft") {
        leftPressed = true;
    }
}

function keyUpHandler(e) {
    if (e.key == "Right" || e.key == "ArrowRight") {
        rightPressed = false;
    }
    else if (e.key == "Left" || e.key == "ArrowLeft") {
        leftPressed = false;
    }
}

function collisionDetection() {
    for (var c = 0; c < brickColumnCount; c++) {
        for (var r = 0; r < brickRowCount; r++) {
            var b = bricks[c][r];
            if (b.status == 1) {
                if (x > b.x && x < b.x + brickWidth && y > b.y && y < b.y + brickHeight) {
                    dy = -dy;
                    b.status = 0;
                }
            }
        }
    }
}

function drawBall() {
    ctx.beginPath();
    ctx.arc(x, y, ballRadius, 0, Math.PI * 2);
    ctx.fillStyle = "#0095DD";
    ctx.fill();
    ctx.closePath();
}

function drawPaddle() {
    ctx.beginPath();
    ctx.rect(paddleX, canvas.height - paddleHeight, paddleWidth, paddleHeight);
    ctx.fillStyle = "#0095DD";
    ctx.fill();
    ctx.closePath();
}

function drawBricks() {
    for (var c = 0; c < brickColumnCount; c++) {
        for (var r = 0; r < brickRowCount; r++) {
            if (bricks[c][r].status == 1) {
                var brickX = (c * (brickWidth + brickPadding)) + brickOffsetLeft;
                var brickY = (r * (brickHeight + brickPadding)) + brickOffsetTop;
                bricks[c][r].x = brickX;
                bricks[c][r].y = brickY;
                ctx.beginPath();
                ctx.rect(brickX, brickY, brickWidth, brickHeight);
                ctx.fillStyle = "#0095DD";
                ctx.fill();
                ctx.closePath();
            }
        }
    }
}

function draw() {
    ctx.clearRect(0, 0, canvas.width,

 canvas.height);
    drawBricks();
    drawBall();
    drawPaddle();
    collisionDetection();

    if (x + dx > canvas.width - ballRadius || x + dx < ballRadius) {
        dx = -dx;
    }
    if (y + dy < ballRadius) {
        dy = -dy;
    } else if (y + dy > canvas.height - ballRadius) {
        if (x > paddleX && x < paddleX + paddleWidth) {
            dy = -dy;
        }
        else {
            alert("GAME OVER");
            document.location.reload();
            clearInterval(interval);
        }
    }

    if (rightPressed && paddleX < canvas.width - paddleWidth) {
        paddleX += 7;
    }
    else if (leftPressed && paddleX > 0) {
        paddleX -= 7;
    }

    x += dx;
    y += dy;
    requestAnimationFrame(draw);
}

draw();
In this code, draw() is the main function that updates the game elements and redraws them on each frame. The game logic includes moving the ball, detecting collisions with the paddle and bricks, and moving the paddle based on user input.
To run the game, you need to create three files: index.html, style.css, and game.js, and then open index.html in a web browser. The game will start running, and you can play by moving the paddle left and right using the arrow keys.
Example 2: Snake Game
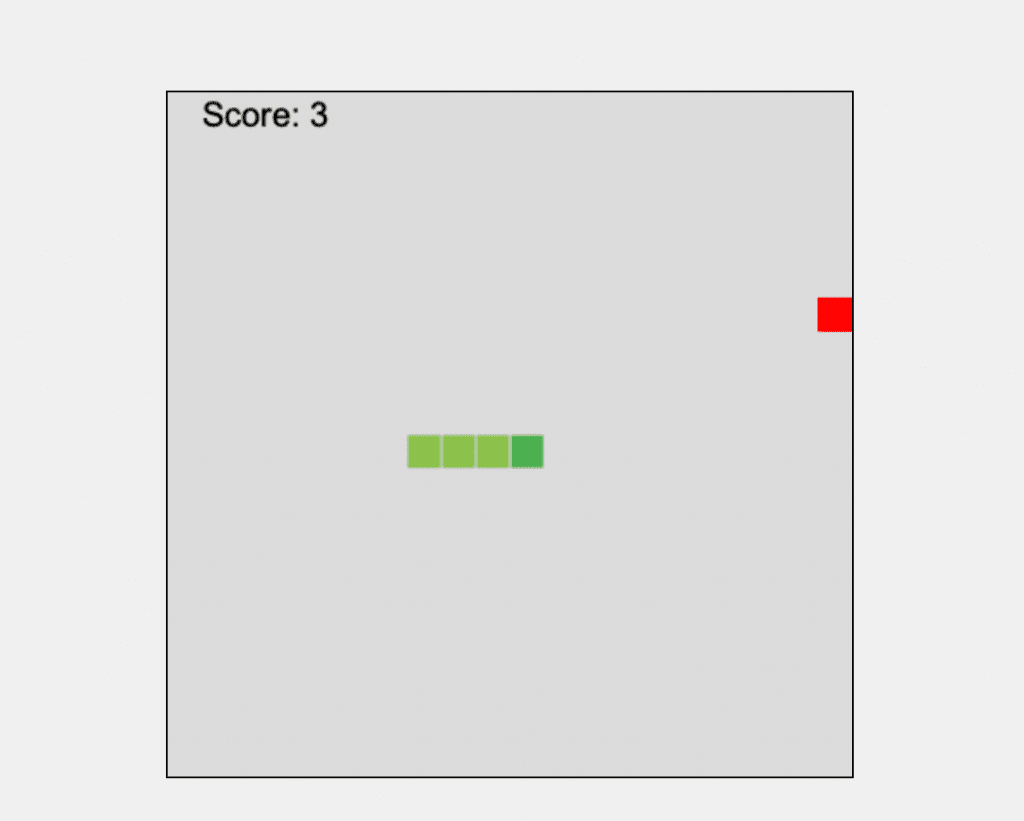
Creating a simple Snake game using HTML, CSS, and JavaScript is an excellent project for understanding basic game development on the web. Below is a basic implementation of the Snake game. The game includes a snake that the player can control with the arrow keys to collect food items, which increases the snake’s length.
HTML (index.html)
This file sets up the canvas for the game.
<!DOCTYPE html>
<html>
<head>
    <title>Snake Game</title>
    <link rel="stylesheet" type="text/css" href="style.css">
</head>
<body>
    <canvas id="gameCanvas" width="400" height="400"></canvas>
    <script src="game.js"></script>
</body>
</html>
CSS (style.css)
Basic styling for the game canvas.
body {
    display: flex;
    justify-content: center;
    align-items: center;
    height: 100vh;
    margin: 0;
    background-color: #f0f0f0;
}

canvas {
    border: 1px solid #000;
}
JavaScript (game.js)
This file contains the game logic for the Snake game.
const canvas = document.getElementById("gameCanvas");
const ctx = canvas.getContext("2d");
const box = 20;
const canvasSize = 400;
let snake = [];
snake[0] = { x: 9 * box, y: 10 * box };
let food = {
    x: Math.floor(Math.random() * 19 + 1) * box,
    y: Math.floor(Math.random() * 19 + 1) * box
};
let score = 0;
let d;

document.addEventListener("keydown", direction);

function direction(event) {
    if (event.keyCode == 37 && d != "RIGHT") {
        d = "LEFT";
    } else if (event.keyCode == 38 && d != "DOWN") {
        d = "UP";
    } else if (event.keyCode == 39 && d != "LEFT") {
        d = "RIGHT";
    } else if (event.keyCode == 40 && d != "UP") {
        d = "DOWN";
    }
}

function collision(head, array) {
    for (let i = 0; i < array.length; i++) {
        if (head.x == array[i].x && head.y == array[i].y) {
            return true;
        }
    }
    return false;
}

function draw() {
    ctx.fillStyle = "#dcdcdc";
    ctx.fillRect(0, 0, canvasSize, canvasSize);

    for (let i = 0; i < snake.length; i++) {
        ctx.fillStyle = (i == 0) ? "#4caf50" : "#8bc34a";
        ctx.fillRect(snake[i].x, snake[i].y, box, box);

        ctx.strokeStyle = "#dcdcdc";
        ctx.strokeRect(snake[i].x, snake[i].y, box, box);
    }

    ctx.fillStyle = "red";
    ctx.fillRect(food.x, food.y, box, box);

    let snakeX = snake[0].x;
    let snakeY = snake[0].y;

    if (d == "LEFT") snakeX -= box;
    if (d == "UP") snakeY -= box;
    if (d == "RIGHT") snakeX += box;
    if (d == "DOWN") snakeY += box;

    if (snakeX == food.x && snakeY == food.y) {
        score++;
        food = {
            x: Math.floor(Math.random() * 19 + 1) * box,
            y: Math.floor(Math.random() * 19 + 1) * box
        };
    } else {
        snake.pop();
    }

    let newHead = {
        x: snakeX,
        y: snakeY
    };

    if (snakeX < 0 || snakeY < 0 || snakeX >= canvasSize || snakeY >= canvasSize || collision(newHead, snake)) {
        clearInterval(game);
        alert("Game over. Your score: " + score);
    }

    snake.unshift(newHead);

    ctx.fillStyle = "black";
    ctx.font = "20px Arial";
    ctx.fillText("Score: " + score, box, box);
}

let game = setInterval(draw, 100);
In this code, draw() is the main function that updates the game elements and redraws them on each frame. The game logic includes moving the snake, handling food consumption, and collision detection with the snake’s body and the game area boundaries.
To run the game, create three files: index.html, style.css, and game.js, and then open index.html in a web browser. The game will start, and you can play by moving the snake using the arrow keys.
Conclusion
The games above are very basic, but in only a few lines of code, you get a familiar game that works. Just imagine what could be done with these simple technologies!
Game development with CSS and HTML is not only possible but also an exciting area of web development. It opens up game development to a broader range of developers, leveraging skills in web technologies. While it may not replace traditional game development tools for more complex games, it offers a unique and accessible way to create fun and engaging web-based games. As web technologies continue to advance, the possibilities for HTML and CSS in game development will only grow, making it an exciting field to explore.